
Rotting Window Trim: Quick Repair Solutions
Learn how to identify, repair, and prevent rotting window trim to save money and maintain your home's integrity in damp climates.
By Seattle Trim Repair · Published · Updated
Rotting window trim is a common issue caused by moisture seeping into wood fibers, leading to decay and potential structural damage. Ignoring the problem turns a $120-$400 repair into a $4,500-$12,000 project. This guide explains how to assess damage, repair rotted trim, and prevent future issues—particularly important in Seattle’s damp climate with 155 rainy days annually.
Early detection is critical. Soft or spongy wood, discoloration, peeling paint, mold, or warped trim signal that moisture has compromised the wood. Addressing these signs quickly prevents rot from spreading to sheathing, framing, and sills.
How to Check for Trim Damage
Before diving into repairs for rotting window trim, figure out how bad the damage is. A thorough inspection helps you decide whether the issue is minor or points to more serious decay.
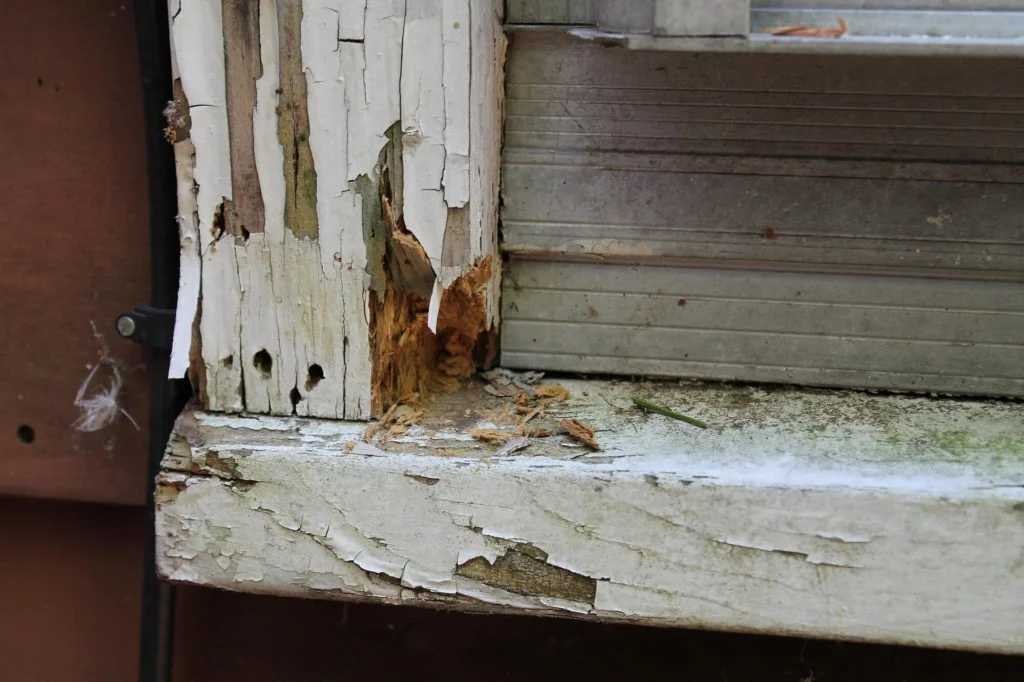
What Rotting Window Trim Looks Like
Rotting trim is not hard to spot if you know what to look for. Watch for these telltale signs:
- Wood that feels soft or spongy when pressed
- Discoloration, often in darker patches or shades of white, brown, black, or green
- Paint that is peeling or bubbling
- Mold, showing up as black flecks or greenish patches
- Trim that is warped, bowed, or has gaps forming at corners
Testing Wood with Simple Tools
Once you have spotted these visual clues, take things further by testing the trim. Use a small tool to press on wood—if it feels soft or gives way, there is likely rot. Another easy test: slide a business card into gaps at joints or seams. If it slips in easily, it could mean moisture has already worked its way in. These quick checks confirm damage extent and help plan your repair strategy.
Tools and Materials You’ll Need
Before starting your repair project, make sure you have the right tools and materials to handle Seattle’s damp conditions. Using weather-resistant options ensures repairs last.
Basic Repair Tools
You need a few essential tools to get the job done right. Start with a putty knife for scraping and applying filler, and a sharp chisel paired with a small pry bar to remove damaged wood. For sanding, grab 80-grit sandpaper for initial smoothing and 220-grit sandpaper for finishing touches. A moisture meter confirms wood is dry enough to work on.
Other handy tools include a utility knife for precise cuts, a brush to clear debris from cracks, tape measure and pencil to mark repair areas, and a drill with various bits for tasks like drilling drainage holes or securing loose trim.
Best Materials for Trim Repairs
For minor damage, wood filler works well. For more severe rot, a two-part epoxy kit is your best bet. These kits typically include penetrating epoxy to stabilize wood and filler epoxy to rebuild damaged areas.
Safety Equipment and Tips
Safety should always come first. Wear protective gloves, safety glasses, and a dust mask when working with materials like epoxy. If your home is older, test for lead paint using a lead paint kit before starting repairs.
Good ventilation is key when working with epoxy or other chemical products. Use fans or work on days when you can keep windows and doors open for airflow. Always follow safety instructions provided by product manufacturers.
Keep children and pets away while working and during curing times. Having a first aid kit nearby is also a smart precaution.
How to Repair Rotting Window Trim
Once you have gathered tools and materials, it is time to get started on the repair. The secret to a lasting fix lies in working step by step and ensuring every bit of damaged wood is removed before rebuilding the area.
Cutting Out Damaged Wood
After inspecting trim, begin by removing all rotted wood. Use a screwdriver to test the area—if wood feels soft, spongy, or rubbery, it is time to cut it out completely.
For surface-level rot, a sharp chisel or putty knife works well to scrape away decayed wood until you reach solid, healthy material. Remove a little extra wood to ensure no rot is left behind. If damage runs deeper, a drill helps expose affected areas more thoroughly.
For sections with severe rot, you need to cut out entire pieces. Start by slicing through any caulk or paint sealing trim with a utility knife. Then, use a multi-tool, hand saw, or reciprocating saw to remove the damaged section. A reciprocating saw is particularly handy for cutting through stubborn nails or screws.
Once the piece is removed, pull out any exposed nails with a hammer or pry bar. Wood rot spreads quickly, so do not try to save wood that feels soft or crumbly—it is better to replace it.
Strengthening the Remaining Wood
With damaged wood gone, it is time to reinforce what is left. If there are minor soft spots, apply wood hardener to stabilize the area and prepare it for filling.
Since wood hardener contains volatile organic compounds (VOCs), safety is a must. Work in a well-ventilated space, and wear a respirator, safety goggles, nitrile gloves, and protective clothing like long sleeves and pants. Follow product instructions carefully and allow it to cure completely before moving on. Proper curing is essential to ensure the repair stands up to moisture and weather over time.
Filling Gaps and Finishing the Surface
After reinforcing wood, it is time to restore trim to its original shape. Mix exterior-grade wood filler or epoxy wood filler according to manufacturer directions. If damage is extensive, epoxy resin is a better choice since it offers superior structural strength.
Using a putty knife, apply filler, slightly overfilling the area to allow for sanding. For smaller gaps, expanding foam can also work—just give it about 24 hours to cure before sanding and priming.
Let filler cure completely, which can take anywhere from a few hours to overnight depending on product and conditions. Once set, sand the repaired area with 80-150 grit sandpaper to blend it seamlessly with surrounding trim. Finish with finer grit for a smooth surface, and remove all dust using a blower, damp cloth, or tack cloth before painting.
Seal screw holes and joints with exterior-grade caulk before priming. Apply exterior wood primer—oil-based primers are especially effective for older windows—followed by water-based weather-resistant paint. Once primer is fully dry, add at least two coats of exterior paint to protect your repair from the elements.
Best Repair Materials for Seattle Weather
When making repairs that can handle Seattle’s famously damp climate, choosing the right materials is just as important as applying them correctly. With frequent rain and fluctuating temperatures, you need materials that endure heavy moisture and resist wear over time.
Epoxy vs. Wood Filler
Epoxy resin stands out as a top choice for structural repairs in wet environments. Using a complete epoxy system—which typically includes two-part resin, filler, and primer—can cost around $150. Premium options offer superior moisture resistance, making them solid investments for Seattle’s tough weather conditions.
Wood fillers, including cellulose-based and two-part varieties, are more budget-friendly. These are best suited for fixing surface-level damage or minor imperfections. While they do not offer the same durability as epoxy, they are a practical option for smaller, less critical repairs.
The key to successful repair, regardless of material, lies in thorough surface preparation and proper sealing. Although epoxy may come with higher upfront cost, its ability to withstand moisture often translates to longer-lasting results in Seattle’s wet and unpredictable weather.
How to Prevent Future Trim Rot
To safeguard trim and protect your investment, proactive measures are essential—especially in Seattle, where 155 rainy days annually and constant Puget Sound humidity take a toll on exterior trim.
Regular Inspection Schedule
Catching issues early is the best way to avoid costly repairs. Inspect trim during routine painting every 3-4 years, especially for natural wood. But do not limit inspections to just painting season.
The exterior trim surrounding your windows is one of the most vulnerable areas of your home to decay or rot fungi. Pay close attention to moisture-prone areas like windowsills, door frames, and corners. Look for signs of trouble such as soft spots, failing caulking, or peeling primer. Also watch for external factors like roof leaks, clogged gutters, or plumbing issues that could contribute to water damage.
Once you have confirmed wood is in good condition, focus on sealing and painting to keep moisture out.
Sealing and Painting for Protection
Sealing and painting are your first line of defense against Seattle’s damp climate. Start by thoroughly preparing the surface. Scrape off any loose or peeling paint, ideally down to bare wood. Sand the area smoothly, working from coarse to fine grits. After sanding, clean surface with a damp rag or Shop Vac to remove dust.
Apply moisture-controlling primer to guard against water damage and peeling. Fill any large gaps or cracks with wood putty or lightweight compound before priming. Use high-quality, weather-resistant paint and sealants designed to handle the region’s wet weather.
Do not forget regular maintenance like caulking and ensuring proper drainage to prevent water from seeping in. If you find yourself repairing the same areas repeatedly, it might be time to consider replacing trim with more durable materials.
Better Materials for Trim Replacement
When repairs are no longer enough, upgrading to moisture-resistant trim materials saves time and effort in the long run. Excellent options include:
- PVC trim: Affordable and completely moisture-proof, ideal for wet climates.
- Polyurethane trim: Known for durability and ability to withstand harsh weather.
- Cedar trim: A natural choice with good water resistance, though it requires regular maintenance like caulking and repainting every five years to prevent UV and water damage.
- Vinyl trim: Offers excellent weather resistance and requires minimal upkeep.
- Fiber cement trim: Completely moisture-resistant and requires only occasional repainting.
Rotted wood is a common issue in homes, especially in areas exposed to moisture, such as windowsills and door frames. Many rot problems stem from poor material quality or improper installation. By opting for moisture-resistant materials and maintaining them regularly, you break the cycle of constant repairs and keep trim in great shape, even in Seattle’s challenging climate.
Protecting Your Window Trim
To keep window trim in good shape, focus on early detection, timely repairs, and consistent upkeep. Regularly check for signs of trouble like soft spots, peeling paint, or discoloration—especially around windowsills and corners. If you spot damage, do not wait.
Remove any rotted sections and use epoxy for structural fixes or wood filler for smaller repairs. The best way to stop windows from rotting is regular maintenance and painting them every 7 years or so.
Preventive care makes all the difference. Inspect trim annually for signs of paint failure or moisture damage. Catching issues early saves you from expensive repairs down the line.
To avoid recurring rot, ensure proper drainage, keep gutters clean, trim back vegetation, and address leaks promptly. Material choice is just as important as maintenance. For homeowners in rainy areas like Seattle, opting for moisture-resistant materials is a smart move. Combine that with regular caulking and high-quality, weather-resistant paint to create a strong barrier against moisture.
For significant damage or when you want expert care, professional services handle everything from minor fixes starting at $120 to full structural restoration. A free dry rot inspection catches problems early, saving you from costly emergencies and ensuring trim lasts for years to come.
Need help with rotting window trim? Explore our exterior trim repair services or call (425) 517-1751 for a free estimate.
Not sure how bad yours is?
Send a photo or describe the spot over the phone. We will tell you whether it is a patch, a section, or something structural before anyone comes out.
Mon–Fri, 7:00am – 5:00pm
Questions homeowners ask us about this
How can I tell if my window trim is too damaged for a DIY repair?
What materials work best for repairing rotted window trim in a damp climate like Seattle?
How often should I check my window trim for rot, and what warning signs should I watch for?
Can I prevent window trim rot, or is replacement inevitable in Seattle's rainy climate?
Read next
- Trim Repair
How to Inspect Exterior Trim for Moisture Damage
Learn how to inspect your exterior trim for moisture damage and prevent costly repairs with essential tips and techniques.
- Trim Repair
Ultimate Guide to Preventing Trim Rot
Prevent trim rot in Seattle's damp climate with the right materials, proper installation techniques, and a maintenance routine that works.
- Dry Rot
5 Signs Your Seattle Home Has Dry Rot Damage
Learn to identify the top signs of dry rot in your Seattle home to prevent costly repairs and maintain structural integrity.
Get a straight answer on your siding, trim, or rot
Free estimate, no obligation, and usually a slot the same week. We cover Seattle, Bellevue, Redmond, Kirkland, Bothell, and Tacoma.
Mon–Fri, 7:00am – 5:00pm · Free estimates · Same-week scheduling