
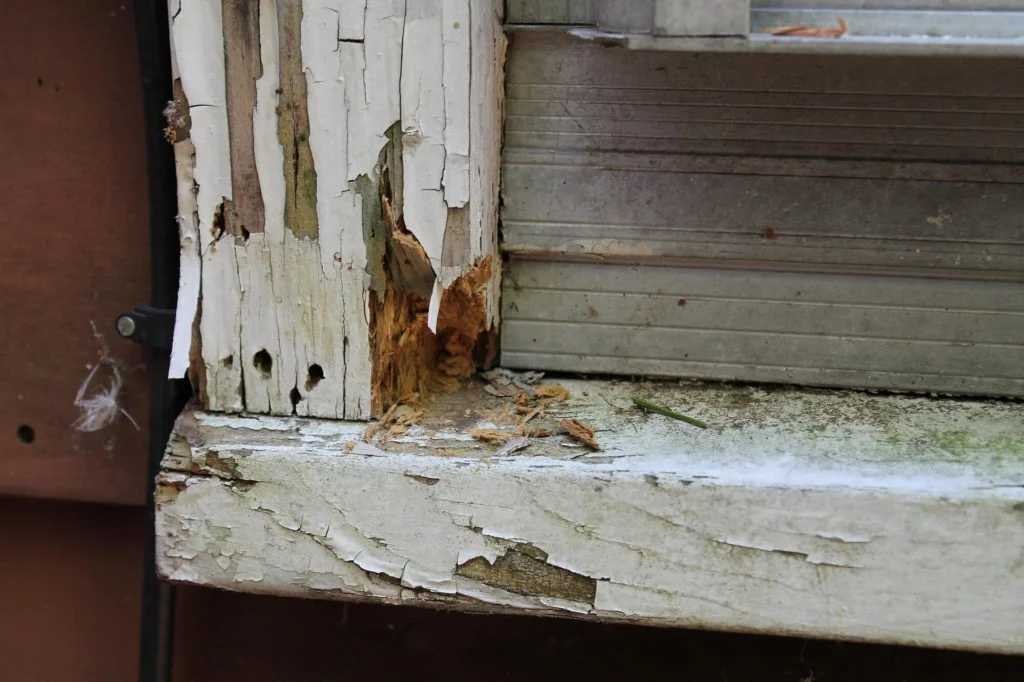
How to Inspect Exterior Trim for Moisture Damage
Learn how to inspect your exterior trim for moisture damage and prevent costly repairs with essential tips and techniques.
By Seattle Trim Repair · Published · Updated
Moisture damage in exterior trim leads to costly repairs if ignored. Regular inspections—ideally twice a year—help you spot early signs like discoloration, peeling paint, or soft wood. These issues often hide beneath surfaces, so knowing where and how to look is key.
In Seattle’s climate with 155 rainy days and persistent marine air, exterior trim faces relentless moisture exposure. Window frames, door casings, fascia boards, and corner trim are particularly vulnerable. Catching damage early prevents it from spreading to sheathing, framing, and insulation.
Signs of Moisture Damage in Exterior Trim
Spotting moisture damage early saves you from expensive repairs. Pay attention to both visual and tactile signs to catch issues before they worsen.
What to Look For
Discoloration and peeling paint are key indicators of moisture problems. Dark streaks, brown or black stains, or areas of wood appearing darker than the rest suggest water has been absorbed into the material. Peeling, bubbling, or cracking paint often occurs when moisture builds up beneath the surface, forcing paint to lift.
Mold and mildew are common warning signs. These appear as fuzzy green, black, or white patches on trim, especially in shaded or poorly ventilated spots. Even a small patch of mold signals excess moisture and needs immediate attention.
Cracks or splits in trim boards happen when wood repeatedly swells and shrinks due to moisture fluctuations. These not only indicate damage but also allow more water to seep in, worsening the issue.
What to Feel For
Press gently on trim to test its firmness. Solid wood should feel sturdy. Soft or spongy spots that yield under light pressure suggest wood fibers have begun to break down from prolonged moisture exposure.
Spongy areas that compress slightly and do not spring back are another red flag, indicating the wood’s internal structure is deteriorating.
Warping creates uneven surfaces or gaps. Run your hand along trim—if boards bow, twist, or cup, it is likely due to moisture causing uneven expansion and contraction.
Swollen trim boards may also signal moisture issues, causing joints to become overly tight or misaligned with adjacent surfaces.
Problem Areas to Check First
Start by inspecting around windows and doors, as these areas are heavily exposed to water. Trim here is particularly vulnerable due to potential issues with sealing, flashing, or drainage. Pay close attention to bottom corners where water tends to collect.
Look at fascia boards under the roofline, especially if gutters are clogged, damaged, or not draining properly. These boards often bear the brunt of roof runoff and can deteriorate when water overflows. Check areas directly below gutter joints and downspout connections for signs of trouble.
Ground-level trim is at high risk, exposed to moisture from soil and landscaping. Ensure water is being directed away from the base of your home to prevent rot.
Examine exterior corners of your house, as these spots endure more weather exposure and have complex joints that can fail over time.
Check where trim meets other materials like siding, brick, or stone. These intersections can be vulnerable if not properly sealed, allowing water to seep in.
How to Inspect Exterior Trim
Spotting moisture problems early saves you from costly repairs. Here is how to conduct a thorough inspection of your exterior trim.
Visual Inspection Steps
Start by inspecting all trim components systematically. Cover decorative and protective elements around windows, doors, corners, fascia, and soffits, moving in a consistent direction.
Bubbling Paint: Keep an eye out for bubbling paint. Unlike peeling, bubbling indicates trapped moisture beneath the surface.
Moss or Lichen Growth: These thrive in damp environments, signaling lingering moisture on or near trim.
Musty Odors: Use your nose—hidden moisture or mold often gives off a musty smell, even if damage is not visible.
Be cautious of fresh paint, as it can sometimes conceal underlying issues.
Using Tools to Find Moisture
If visual signs raise concerns, bring out the tools. Moisture meters are essential for identifying hidden issues. If there is an active leak, it is obviously more serious than a dry stain that may have been there for 10-plus years before the last roof replacement. A good moisture meter is a must-have tool for thorough inspections.
Non-Destructive Meters: Start with a pinless moisture meter to quickly scan large areas without damaging trim. Focus on areas with visible damage.
Pin Probes: For deeper analysis, use pin probes to measure moisture content within trim structure. These are ideal for confirming elevated moisture levels detected by the pinless meter.
Quantitative Readings: Look for meters providing precise measurements, like percentage moisture content (%MC) or Wood Moisture Equivalent (WME), to gauge problem severity.
You can also test suspicious areas manually. Press with your finger or a screwdriver to check for soft or crumbling wood. Focus on high-risk areas like window frames, door thresholds, and roofline trim.
In 27 years of inspections, 95 percent of all issues in a home are water-related unless you live in the middle of a desert. A moisture meter, thermal camera, and flashlight are the three main inspection tools.
Checking Joints and Caulking
Water intrusion often starts at poorly sealed joints and openings. Most water intrusion happens through openings in siding, like windows, decks, and roofs. The openings are either not adequately flashed, properly wrapped to shed water, caulked to stop water entry, or designed wrong.
Inspect caulking around windows, doors, and other penetrations:
- Look for gaps, cracks, or shrinkage in caulk lines, especially at bottom corners of windows and doors where water collects.
- Pay attention to areas where different materials meet. The intersections of dissimilar materials need to be sealed with high-quality, flexible sealant to prevent water intrusion into exterior walls.
Check flashing around windows, doors, and roof intersections for damage or improper installation. Improper sealing, insufficient drainage, or damaged gutters can lead to water infiltration, causing rot and deterioration.
Verify proper clearances. Trim should maintain at least 6 inches from soil or landscaping and 1-2 inches from concrete slabs. Improper clearances allow moisture to wick into wood, leading to rot. Pay special attention to door corners and thresholds, as these areas endure heavy water exposure and are often overlooked.
This detailed inspection helps you identify potential moisture issues and prepare for the next steps in addressing common causes of damage.
What Causes Moisture Damage
Understanding how moisture damage occurs saves you from expensive repairs and helps protect your trim. Water can find its way into trim through various weak points, and some materials are more prone to damage than others.
How Water Gets In
Water infiltration often starts with improper flashing or aging caulk, which leave gaps for moisture to sneak through. Horizontal surfaces, like window and door headers, are particularly at risk since they naturally collect water.
Poor drainage is another common culprit. Clogged gutters or downspouts that dump water near the foundation cause pooling, which saturates trim over time. Similarly, if landscaping slopes toward your house, surface water flows against the foundation and nearby trim, leading to damage.
Trim installed too close to soil or sprinkler systems absorbs moisture through capillary action. Without enough clearance, trim becomes a sponge for water.
Roof and gutter problems, such as ice dams, broken shingles, or poorly aligned gutter joints, also direct water onto trim surfaces, exacerbating the issue.
Materials Most Affected by Moisture
Not all trim materials handle water exposure equally. Here is how various types stand up to moisture:
Untreated Wood: Softwoods like pine and fir are highly absorbent, making them prone to rot, warping, and insect infestations. Pressure-treated wood offers better protection, but if ends are not sealed or treatment wears off, it can still succumb to moisture. Regular upkeep, such as painting or staining, is essential.
Hardboard and Engineered Wood: Products like MDF are particularly sensitive to water. When they get wet, they tend to swell and rarely return to original shape. If surface coating is compromised, these materials deteriorate quickly, often requiring full replacement instead of minor repairs.
Fiber Cement: Brands like James Hardie produce fiber cement trims that resist moisture better than wood. However, they can still face issues at cut edges or where factory finish has been damaged. Proper installation with adequate flashing and caulking is key to longevity.
PVC and Vinyl: These materials do not rot and are highly moisture-resistant. However, they expand and contract with temperature changes, which can strain caulk joints and create gaps where water might sneak in behind trim.
Metal Trims: Aluminum and steel trims do not absorb moisture but come with their own challenges. Aluminum can corrode when exposed to certain chemicals or materials, while steel requires coatings to prevent rust. Any scratches or chips in finish leave these trims vulnerable to corrosion.
Durability of any trim material ultimately depends on more than just moisture resistance—it also hinges on proper installation and consistent maintenance.
Prevention and Professional Help
Taking care of your exterior trim is an essential step in protecting your home’s structure and avoiding expensive repairs down the road.
How to Prevent Moisture Damage
Regular maintenance is your first line of defense against moisture damage. By staying consistent with inspections and upkeep, you catch small problems before they escalate. Plan to inspect trim twice a year—ideally in spring and fall. Look for signs like peeling paint, failing caulk, or water stains.
Pay close attention to caulk and flashing. Remove and replace deteriorated caulk with high-quality exterior caulk suited to your climate. Focus on areas where trim meets siding, around windows and doors, and at corner joints. This step is crucial for sealing out water.
Repaint or restain trim every 3-5 years to keep it protected. Do not wait for paint to peel or wood to become exposed—those are warning signs that moisture has already started seeping in.
Other preventative measures include keeping gutters clean, directing water away from your home’s foundation, maintaining at least 6 inches of clearance between trim and soil, avoiding sprinkler spray on trim, and ensuring soffit and eave vents stay clear to prevent moisture buildup.
When to Call a Professional
Even with diligent maintenance, some issues require professional expertise. Reach out for help if you spot visible problems like peeling paint, discoloration, stains, soft or rotting wood, or cracks, warping, or splitting in trim.
Often, moisture problems hide where you cannot see them. More than 90 percent of moisture issues occur within wall cavities, out of sight. If you notice musty odors, unexplained humidity in the attic or crawl space, or mysterious stains on interior walls, these could be clues pointing to hidden moisture infiltration.
Timing matters for professional inspections. Consider scheduling moisture testing before starting major projects like window replacements, when buying or selling a home (especially one with stucco siding), around the one-year mark after an exterior remodel, or after any water-related event—storm, plumbing leak, or roof damage.
Professional help becomes crucial when damage is widespread or when you are unsure whether repair or replacement is the better option. If you have followed all recommended prevention steps but still notice persistent damage, it is time to bring in experts.
Experienced contractors assess severity and recommend the most cost-effective solution—whether targeted repairs or full replacement with more durable materials. Beyond identifying problems, professionals bring valuable expertise: suggesting the best replacement materials, ensuring proper installation to prevent future issues, and often providing warranties for added peace of mind.
When moisture damage impacts structural elements or multiple trim areas show signs of deterioration, professional intervention ensures repairs are done right the first time.
Protecting Your Home’s Trim
Keeping your home’s exterior trim safe from moisture damage starts with staying on top of regular inspections and catching problems early. By looking out for warning signs like discoloration, soft spots, warping, or peeling paint, you address issues before they turn into expensive repairs.
Spotting moisture problems early stops damage from spreading to structural parts of your home, helps prevent mold that could affect your family’s health, boosts your home’s energy efficiency by sealing out drafts, and maintains your home’s value and curb appeal.
Over 90 percent of moisture issues are hidden inside wall cavities. Even with regular inspections, some problems might go unnoticed. If you are dealing with musty smells, unexplained humidity, or interior stains, call in professionals for moisture testing.
While routine maintenance—like annual inspections and caulking—handles most problems, there are times when expert help is necessary. Professional inspections pinpoint trouble spots and provide expertise needed for serious issues DIY fixes cannot handle.
Whether routine upkeep or professional help, taking action now saves you from costly repairs later and ensures your home stays safe, healthy, and in great condition.
Ready to protect your trim from moisture damage? Explore our exterior trim repair services or call (425) 517-1751 for a free inspection.
Not sure how bad yours is?
Send a photo or describe the spot over the phone. We will tell you whether it is a patch, a section, or something structural before anyone comes out.
Mon–Fri, 7:00am – 5:00pm
Questions homeowners ask us about this
How often should I check my exterior trim for moisture damage to avoid expensive repairs?
What tools do I need to detect hidden moisture damage in exterior trim, and how are they used?
When should I hire a professional to inspect and repair moisture damage on my exterior trim?
What are the most vulnerable areas for trim moisture damage in Seattle homes?
Read next
- Trim Repair
Rotting Window Trim: Quick Repair Solutions
Learn how to identify, repair, and prevent rotting window trim to save money and maintain your home's integrity in damp climates.
- Trim Repair
Ultimate Guide to Preventing Trim Rot
Prevent trim rot in Seattle's damp climate with the right materials, proper installation techniques, and a maintenance routine that works.
- Trim Repair
5 Signs Your Exterior Trim Needs Replacement
Learn the key warning signs that your home's exterior trim needs replacement to prevent costly structural damage and maintain curb appeal.
Get a straight answer on your siding, trim, or rot
Free estimate, no obligation, and usually a slot the same week. We cover Seattle, Bellevue, Redmond, Kirkland, Bothell, and Tacoma.
Mon–Fri, 7:00am – 5:00pm · Free estimates · Same-week scheduling