
Ultimate Guide to Preventing Trim Rot
Prevent trim rot in Seattle's damp climate with the right materials, proper installation techniques, and a maintenance routine that works.
By Seattle Trim Repair · Published · Updated
Trim rot is one of the most common and costly exterior maintenance issues facing Seattle homeowners. The region’s persistent rainfall, high humidity, and limited sunlight create ideal conditions for fungal decay in wood trim. Left unaddressed, rot spreads from surface damage into structural components, leading to expensive repairs and potential pest infestations. The good news is that trim rot is largely preventable through smart material choices, proper installation techniques, and consistent maintenance. This guide provides a complete framework for protecting your home’s exterior trim from moisture-driven decay.
Understanding what causes trim rot is the first step in prevention. The fungus Serpula lacrymans requires three conditions to thrive: wood moisture content above 20 percent, temperatures between 59°F and 71.6°F, and poor air circulation. Seattle’s climate provides all three for much of the year. The city averages 155 rainy days annually, and our mild temperatures rarely drop low enough to interrupt fungal activity. Modern lumber, grown faster than old-growth timber, is less dense and more vulnerable to decay. Once rot establishes itself, it spreads aggressively through wood and even into masonry, creating a problem that compounds over time.
Why Seattle Homes Face Higher Trim Rot Risk
Seattle’s weather creates a perfect environment for wood decay. With 155 rainy days per year delivering approximately 37 inches of rainfall, moisture is the constant enemy of exterior trim. High humidity keeps wood damp even between rain events, preventing the drying cycles that protect trim in arid climates. Unlike regions with harsh winters where freezing temperatures slow fungal growth, our mild Pacific Northwest climate allows decay to progress year-round.
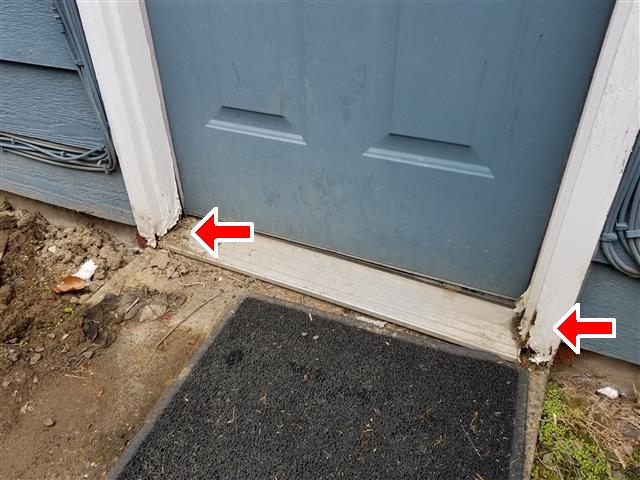
Poor drainage compounds the problem. When gutters clog or downspouts discharge too close to the foundation, water saturates trim at vulnerable points—fascia boards, window sills, door thresholds. Inadequate sealing around trim joints allows moisture to penetrate behind protective paint layers, trapping water against bare wood where it fuels fungal growth. Untreated or low-quality wood offers little natural resistance to decay. Improper installation—skipping flashing, failing to seal end grains, using the wrong fasteners—creates vulnerabilities that worsen with every storm.
The result is a maintenance challenge unique to the Pacific Northwest. Homes here need extra care to combat constant moisture exposure. Regular inspections, better-quality materials, and thorough sealing are not optional extras—they are essential steps that prevent expensive repairs down the road.
Choosing Durable, Rot-Resistant Trim Materials
Material selection is your first line of defense. In Seattle’s wet climate, choosing the right trim material can mean the difference between decades of reliable performance and frequent, costly replacements.
Pressure-treated wood is the most affordable option at $0.50 to $3.00 per linear foot. Chemically treated to resist rot and insects, it still requires regular upkeep including repainting every 3 to 5 years and routine inspections for decay. While budget-friendly, it demands the most ongoing maintenance.
Cedar offers natural beauty and durability at $2.00 to $6.00 per linear foot. Western Red Cedar contains oils that reduce moisture absorption, allowing it to last for decades with proper care. However, it requires sealing and repainting every 5 to 7 years to maintain integrity. Unsealed cedar will eventually succumb to rot in our climate.
Fiber cement is the top choice for wet climates like Seattle, costing $3.00 to $8.00 per linear foot. Products like James Hardie® board resist water penetration and weathering exceptionally well. Fiber cement handles paint beautifully, including darker shades that would cause problems with some materials. Its long-lasting performance makes it ideal for high-moisture environments.
PVC trim, made entirely of plastic, is completely rot-proof and impervious to moisture at $2.00 to $5.00 per linear foot. It cuts with standard tools but expands and contracts with temperature changes, requiring proper installation techniques and lighter paint colors to avoid heat-related issues.
Composite materials, blending plastic and wood fibers, offer middle-ground performance at $4.00 to $7.00 per linear foot. They resist rot and moisture, accept paint well, and require less maintenance than natural wood.
Modern lumber’s lower density makes it more vulnerable to rot fungus than the old-growth timber used in homes built before 1950. Given Seattle’s wet climate, spending more on rot-resistant materials upfront saves money over time through reduced maintenance and longer replacement cycles.
Installation Techniques That Prevent Moisture Intrusion
Even the best materials fail without proper installation. Creating multiple layers of protection keeps moisture out and ensures long-term performance.
Flashing is critical. Install it above and behind trim, ensuring it extends beyond the wood so water drips off rather than running back toward the building. Metal flashing lasts far longer than caulk, which shrinks and pulls away over time.
Drip edges direct water away from vulnerable surfaces. These small projections at windows, doors, and horizontal trim guide water outward, preventing it from running back against the building and causing damage.
End grain sealing cannot be overlooked. End grains are particularly vulnerable to moisture absorption. Seal them immediately with high-quality exterior primer or paint before installation to block water penetration.
Proper clearance prevents moisture wicking. Keep trim elevated above ground and avoid direct contact with masonry or concrete, which can draw moisture into wood. Use corrosion-resistant fasteners—stainless steel or galvanized screws—to prevent rust stains and structural problems.
A Seattle homeowner who replaced old trim with fiber cement, carefully primed and painted all surfaces, added metal flashing, and used polyurethane caulk, found no signs of moisture damage five years later during routine inspection. This outcome demonstrates the value of thorough installation techniques.
Sealing and Finishing for Maximum Protection
Sealants reinforce your trim’s moisture protection. Choose exterior-grade caulks—polyurethane, silicone, or advanced acrylic latex—to seal joints, seams, and gaps. These materials flex with temperature changes and resist cracking far better than cheap alternatives.
Before applying sealant, clean surfaces thoroughly, remove old caulk completely, and sand smooth for a strong bond. Apply caulk in a continuous bead and smooth it immediately to ensure full adhesion to both surfaces. A concave profile sheds water most effectively.
For paint, use 100 percent acrylic exterior paint, which provides flexibility and resists moisture and UV damage. Apply at least two coats, covering all surfaces including edges and end grains. If working with synthetic materials like PVC, avoid dark colors that absorb heat and cause expansion issues.
Maintenance schedules matter. Inspect caulk and paint annually for cracks, peeling, or shrinkage. Address exposed wood immediately. Plan to reapply caulk every three to five years, or more often if needed. In Seattle’s rainfall and humidity, this proactive care prevents the small problems that become expensive repairs.
Essential Maintenance to Prevent Trim Rot
Moisture-related issues cause up to 90 percent of exterior wood trim failures nationwide. Regular maintenance can reduce trim rot likelihood by more than 50 percent compared to homes where exterior upkeep is neglected.
Annual inspections are your primary defense. Inspect trim after heavy rains or storms when problems are easier to spot. Focus on areas prone to water collection: around gutters and downspouts, window and door sills, corners and seams, and anywhere trim meets other materials. Warning signs include soft or spongy wood when pressed, dark streaks or discoloration, visible mold or mildew, and evidence of pests like termite or carpenter ant damage.
Use a tool to probe suspect areas. Healthy wood feels solid, while rotted sections crumble or feel soft. Document findings to track changes over time and prioritize repairs.
Essential maintenance tasks protect your investment:
Clean gutters and downspouts at least twice yearly, more often if trees surround your home. This prevents water overflow that damages trim. Ensure downspouts direct water at least 3 to 4 feet from your foundation.
Trim vegetation regularly, keeping shrubs, trees, and vines 12 to 18 inches from the house. This improves airflow and minimizes moisture buildup that encourages fungal growth.
Repaint and recaulk every 3 to 5 years. Scrape off peeling paint, prime exposed wood, and apply high-quality exterior paint. Recaulk around windows, doors, and trim joints to seal out moisture.
Maintain proper drainage by ensuring soil slopes away from your home. Use splash blocks or drainage pipes to direct water away from the foundation.
Trim rot repair typically costs $300 to $1,200 per affected area. Catching issues early and following a maintenance schedule saves on costly repairs. If you discover extensive rot, contact professionals who specialize in Seattle’s moisture challenges.
Identifying and Addressing Early Signs of Rot
Early detection saves significant money and hassle. Dry rot starts when wood moisture levels rise above 20 percent, so knowing what to watch for protects your home from extensive damage.
During annual inspections, look for discoloration—dark patches, yellow streaks, or unusual color changes indicating where water has pooled or seeped into wood. Test firmness using your finger or a screwdriver. Healthy wood feels solid and resists pressure, while rot causes softness, sponginess, or crumbling.
Peeling paint or finishes signal trouble. This happens when moisture breaches the protective coating, creating ideal conditions for rot underneath. Mold or fungal growth appears as fuzzy patches in white, green, black, or brown, often accompanied by a musty odor indicating high moisture levels.
Warping, buckling, or gaps in trim suggest the wood structure is starting to fail. Small holes caused by pests often indicate damp, weakened wood that attracts insects.
Focus inspections on high-risk areas: window and door frames, corners, fascia boards and soffits, and spots near gutters or downspouts. In Seattle’s wet climate, these locations are especially prone to rot due to constant moisture exposure. Inspecting them monthly catches problems before they require major intervention.
DIY Repairs vs. Professional Help
For minor, localized damage, a DIY repair may suffice. If decayed wood removes easily with a screwdriver and surrounding material remains solid, you likely have surface-level damage. Remove all soft, rotted wood and let the area dry completely. Apply wood hardener to strengthen remaining wood, then use epoxy wood filler to rebuild the damaged section. Marine epoxy creates durable, weather-resistant repairs. Once cured, sand smooth, prime, and finish with exterior paint. DIY fixes typically cost $20 to $100 for materials.
Call professionals when damage is widespread or affects structural integrity. Signs include deep, extensive softness across large areas, significant warping or large sections of crumbling wood, damage reaching framing or underlying structure, and recurring problems despite previous repairs. Professional trim repair in Seattle costs $250 to $1,000 or more per area, depending on extent and materials.
Delaying repairs, even for minor issues, leads to bigger problems. Rot spreads quickly in Seattle’s damp climate, causing more structural damage, higher repair costs, pest infestations, mold growth, and reduced energy efficiency. If you are dealing with recurring trim rot or significant damage, reach out to contractors who specialize in exterior repairs and understand the Pacific Northwest’s climate challenges.
Long-Term Protection Strategy
Seattle’s 155 rainy days each year pose a unique challenge. Keeping your home’s exterior in top shape requires combining smart material choices, proper installation, and consistent maintenance. While materials like PVC, fiber cement, and pressure-treated lumber cost more upfront, they reduce repair frequency significantly, delivering better long-term value.
Proper installation creates a strong barrier against water intrusion. High-quality sealing and expert craftsmanship prevent moisture from reaching vulnerable wood. Without this protection layer, even superior materials eventually fail.
Regular maintenance is your first line of defense. Simple tasks like inspecting after heavy rains, cleaning gutters, and maintaining paint and caulk make a substantial difference. Catching issues early cuts repair costs by as much as 50 percent compared to fixing advanced damage. This proactive approach is essential for lasting trim rot prevention.
For professional help with trim repair, dry rot prevention, or siding work tailored to Seattle’s climate, call (425) 517-1751 to schedule a free 15-point inspection and protect your home’s exterior for years to come.
Not sure how bad yours is?
Send a photo or describe the spot over the phone. We will tell you whether it is a patch, a section, or something structural before anyone comes out.
Mon–Fri, 7:00am – 5:00pm
Questions homeowners ask us about this
What are the best materials to use for exterior trim to prevent rot in Seattle?
What are the early signs of trim rot, and how should I deal with it?
What maintenance routine prevents exterior trim rot over time?
How much does it cost to repair trim rot in Seattle?
Read next
- Dry Rot
What Causes Dry Rot in Pacific Northwest Homes?
Understand what causes dry rot in Seattle homes, from persistent rain to poor ventilation, and how to prevent structural damage with proven strategies.
- Trim Repair
Top Materials for Durable Exterior Trim Installation
Compare fiber cement, PVC, fiberglass, and aluminum trim for Seattle homes. Learn which materials resist moisture, last longest, and require the least maintenance.
- Dry Rot
5 Steps to Treat Dry Rot in Wood
Fix dry rot permanently with this proven five-step method: stop moisture, remove rotted wood, apply fungicide, harden with epoxy, then finish.
Get a straight answer on your siding, trim, or rot
Free estimate, no obligation, and usually a slot the same week. We cover Seattle, Bellevue, Redmond, Kirkland, Bothell, and Tacoma.
Mon–Fri, 7:00am – 5:00pm · Free estimates · Same-week scheduling