
Home Exterior Inspection Checklist for Seattle Homeowners
Complete exterior inspection guide for Seattle homes: roof, siding, trim, gutters, and foundation. Catch damage early and prioritize repairs.
By Seattle Trim Repair · Published · Updated
Your home’s exterior is its primary defense against Seattle’s weather. Rain, wind, temperature swings, and biological growth from moss and algae place constant stress on roofing, siding, trim, and foundations. Small failures in these systems allow moisture to penetrate wall cavities and framing, where hidden damage accumulates for months or years before it becomes visible inside your home. By the time you notice interior water stains or musty smells, repair costs have often escalated from hundreds of dollars to thousands.
A systematic exterior inspection catches problems early, when they are small, inexpensive, and straightforward to fix. Inspections also help you prioritize maintenance spending, directing resources to high-risk areas before failures occur. In King County’s climate, where annual rainfall averages 37 inches and humidity stays elevated through fall and winter, regular exterior inspections are not optional maintenance; they are essential to protecting your investment.
When to Inspect Your Home’s Exterior
Perform comprehensive exterior inspections twice per year: once in early spring (March or April) after winter storms have passed, and once in late fall (October or November) before Seattle’s wettest months arrive. Spring inspections reveal damage from winter freeze-thaw cycles, wind events, and heavy rain. Fall inspections ensure that roofing, gutters, and drainage systems are ready for the November-through-February period when King County receives the bulk of its annual precipitation.
Additional inspections are warranted after severe weather events: windstorms that bring down branches or debris, heavy snowfall that loads roofs beyond typical design, and prolonged rain events that saturate soil and test drainage systems. If you notice water stains inside your home, musty odors, or visible exterior damage, inspect immediately rather than waiting for the next scheduled check.
Homes with known risk factors should be inspected more frequently. Properties built before 1980 often have outdated flashing details and lack modern drainage planes behind siding. Homes with large trees overhead face constant debris accumulation in gutters and roof valleys. Properties on slopes or with poor grading may experience persistent drainage problems that require quarterly monitoring.
Exterior Inspection Checklist by Component
Work through each component systematically, documenting findings with photos and notes. Use this checklist as your guide.
Roof and Roofing Materials
Inspect from the ground using binoculars, and from a ladder at the roof edge if you can do so safely. Look for missing, cracked, or curling shingles, particularly on south and west exposures where UV damage is greatest. Check that all shingles lie flat and are properly fastened; wind-lifted shingles indicate poor installation or age-related adhesive failure.
Examine roof valleys and the areas around chimneys, vents, and skylights. These are high-stress zones where flashing failure is common. Look for gaps, rust, or separated seams in metal flashing. Inspect the base of vent pipes for cracked or missing rubber boots, which allow water to run directly into the attic.
Check for moss, algae, or debris accumulation. Moss holds moisture against shingles and accelerates granule loss and decay. Heavy debris in valleys can dam water, forcing it under shingles and into the roof deck.
Note the overall condition of the roof. Widespread granule loss, visible wear, or a roof older than 20 years may be approaching the end of its serviceable life, even if no leaks are present yet.
Gutters and Downspouts
Clean gutters are critical to preventing water damage in Seattle. Clogged gutters overflow, saturating fascia boards, soffit panels, and the top courses of siding. Water that spills over the gutter edge also falls near the foundation, increasing the risk of water intrusion into crawl spaces.
Inspect gutters for clogs, sagging sections, and separation from the fascia. Gutters should slope consistently toward downspouts with no standing water after rain. Look for rust spots or holes in metal gutters, and cracks or splits in vinyl gutters.
Check downspouts for clogs by running water from a hose into the gutter. Water should flow freely out the downspout. If it backs up, remove the clog or call a professional. Verify that downspout extensions direct water at least 5-6 feet away from the foundation. Water dumped at the foundation perimeter saturates soil and increases hydrostatic pressure against the foundation wall.
Fascia, Soffit, and Eaves
Fascia boards run along the roof edge and provide the mounting surface for gutters. They are highly vulnerable to rot because they are constantly exposed to rain running off the roof. Inspect fascia for soft spots, dark staining, peeling paint, and gaps where the board has pulled away from the rafter tails.
Soffit panels close the underside of the roof overhang. They should be intact, with no gaps, cracks, or staining. Many soffits include vents that provide attic ventilation; ensure these are not blocked by insulation, debris, or wasp nests.
Check eaves for signs of water intrusion: dark streaks, mold, or rot on the underside of the overhang. These indicate that water is running behind the gutter or fascia and reaching the roof deck and framing.
Siding and Cladding
Walk the perimeter of your home and inspect siding at close range. Look for warped, cracked, or split boards, particularly on south and west walls where sun and wind stress is greatest. Check for paint failure: peeling, bubbling, or flaking paint indicates that moisture is present behind the finish.
Press on the siding with your thumb in suspect areas. Soft or spongy siding suggests rot beneath the surface. Pay close attention to siding near grade, around windows and doors, and at inside and outside corners where water tends to collect.
Inspect for gaps between siding courses, which allow water and pests to enter wall cavities. Check that the bottom course of siding sits at least 6-8 inches above soil, mulch, or hardscaping. Siding in direct contact with the ground wicks moisture and decays rapidly.
Look for biological growth: moss, algae, and mildew appear as green, black, or brown staining on siding. These indicate areas that stay damp and do not dry fully between rain events. North-facing walls and shaded areas are most susceptible.
Trim, Corners, and Penetrations
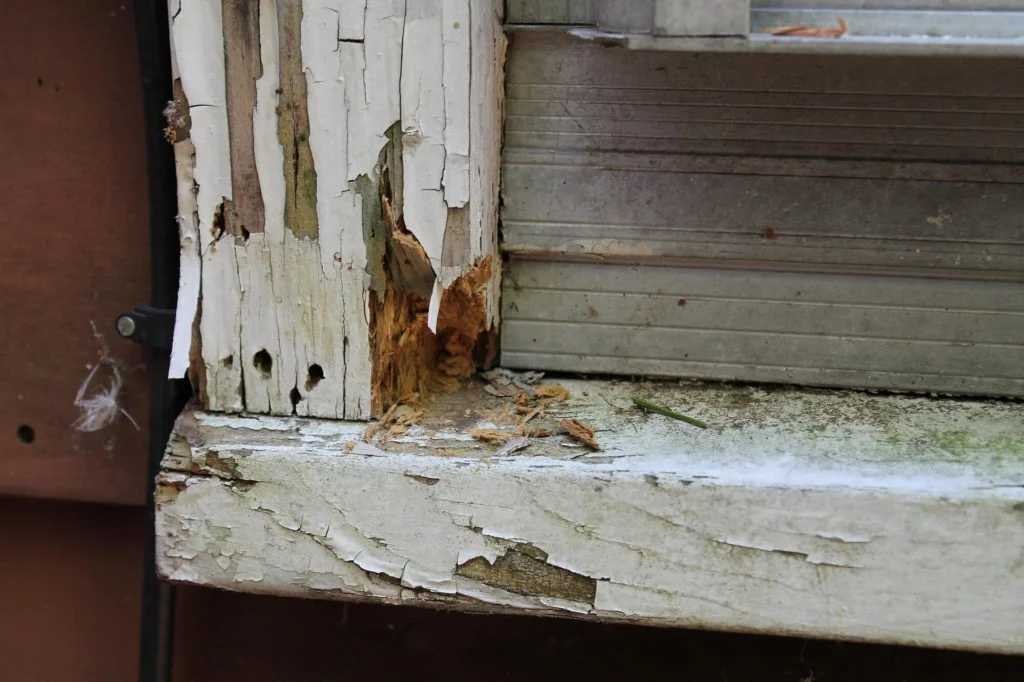
Trim is the detail work that covers joints and transitions, and it is often the first place moisture intrusion occurs. Inspect window and door casings for soft wood, peeling paint, and gaps between the trim and siding. Press on the bottom corners of window trim, where rot commonly begins.
Check corner boards for separation from the siding, dark staining, and soft spots. Inspect all penetrations: dryer vents, electrical meter bases, hose bibs, and exterior lights. Verify that caulk around these penetrations is intact and not cracked or missing.
Examine horizontal trim surfaces like window sills and water table boards. These are shelves where water sits, and they are among the highest-risk areas for dry rot. Look for cupped or checked wood, paint failure, and standing water after rain.
Foundation and Below-Grade Areas
Inspect the foundation perimeter for cracks, settlement, or water staining. Vertical cracks wider than 1/8 inch or horizontal cracks of any width should be evaluated by a structural engineer. Look for efflorescence, a white chalky deposit that indicates water moving through concrete.
Check grading around the home. Soil should slope away from the foundation at a minimum 5 percent grade (roughly a 3-inch drop over 5 feet). Flat or reverse-sloped grading directs water toward the foundation, increasing the risk of infiltration into crawl spaces.
Inspect foundation vents in crawl spaces. They should open and close freely and not be blocked by plantings, debris, or storage items. Verify that window wells are clear and that drainage at the bottom of the well is functioning.
Decks, Porches, and Exterior Structures
Inspect deck ledger boards where the deck attaches to the house. Poor or missing flashing allows water to flow into your home’s framing, often causing extensive hidden damage. Look for gaps, rust on fasteners, and soft wood around the connection.
Walk the deck surface and note any spongy or bouncy areas. Check railings and posts for stability. Inspect the underside of the deck for rot, particularly at beam-to-post connections and joist ends. Look for fungal fruiting bodies, which appear as mushroom-like growths and indicate advanced decay.
Check stairs for secure attachment and solid treads. Inspect the area beneath stairs, where moisture and debris accumulate and ventilation is poor.
Documenting and Prioritizing Findings
Take photos of every issue you identify, with close-ups showing detail and wider shots showing location. Note the date and create a simple spreadsheet or list with columns for location, description, severity, and estimated repair timeline.
Prioritize issues into three categories:
Immediate (repair within days): Active leaks, missing or damaged flashing, soft wood in structural areas, gaps that allow water into the structure, and gutters that overflow or have separated from the fascia.
Near-term (repair within 1-3 months): Failed caulk around windows and doors, damaged or missing shingles, peeling paint on trim, minor siding damage, and clogged or sagging gutters.
Long-term (monitor and plan for future repair): Cosmetic paint wear, minor surface cracks in siding, aging but intact roofing, and routine maintenance items like gutter cleaning and resealing.
When to Call a Professional
Homeowners can perform visual inspections of accessible areas, but professional inspections provide expertise and tools that go beyond surface observation. Professionals use moisture meters to detect hidden water in wall cavities, thermal imaging to locate insulation gaps and moisture intrusion, and roof access to inspect conditions not visible from the ground.
Professional inspections are recommended annually, even if your own inspections do not reveal obvious problems. Many issues, particularly early-stage dry rot, condensation in wall cavities, and failing flashing, are not detectable without specialized tools and experience.
If your inspection reveals extensive damage, structural concerns, or problems in areas you cannot safely access, schedule a professional evaluation before attempting repairs. For Seattle-area homeowners, local contractors familiar with Pacific Northwest moisture patterns can identify the root causes of damage and recommend solutions that prevent recurrence.
Contact our team at (425) 517-1751 for a free professional exterior inspection if your checklist reveals areas of concern or if you want an expert assessment of your home’s condition.
Not sure how bad yours is?
Send a photo or describe the spot over the phone. We will tell you whether it is a patch, a section, or something structural before anyone comes out.
Mon–Fri, 7:00am – 5:00pm
Questions homeowners ask us about this
How often should I inspect my home's exterior in Seattle?
What are the most important areas to check during an exterior inspection?
How do I know if exterior damage requires immediate repair?
Can I perform a home exterior inspection myself or do I need a professional?
Read next
- Dry Rot
Dry Rot Inspection Checklist for Homeowners
Step-by-step dry rot inspection guide with tools, checklists, and warning signs for Seattle homeowners. Catch hidden damage before costly repairs.
- Exterior basics
Seattle Home Exterior Maintenance Checklist by Season
Keep your Seattle home in top shape with this seasonal exterior maintenance checklist. Track tasks by season and prevent costly repairs.
- Dry Rot
5 Warning Signs of Structural Damage on Home Exteriors
Identify critical structural damage signs: foundation cracks, dry rot, warped siding, gaps around openings, and bowing walls. Know when to call professionals.
Where this leads
Get a straight answer on your siding, trim, or rot
Free estimate, no obligation, and usually a slot the same week. We cover Seattle, Bellevue, Redmond, Kirkland, Bothell, and Tacoma.
Mon–Fri, 7:00am – 5:00pm · Free estimates · Same-week scheduling